
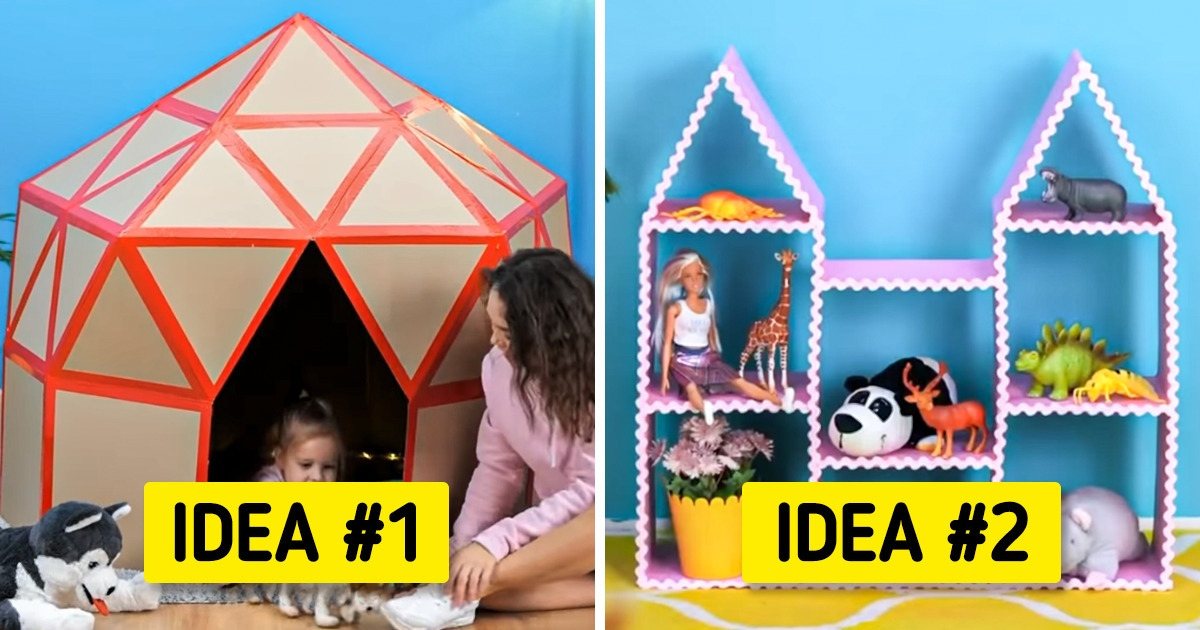
1. Home for children
- Take 2 sq. 15×15 in items of cardboard, put them subsequent to one another, and fasten the sides along with vast adhesive tape.
- One by one, glue 8 extra items of cardboard which are the identical measurement (15×15 in) to the earlier piece of cardboard. Finally, you’ll get a circle from these 10 sq. sheets secured collectively.
- Fasten triangle items (either side of which additionally equals 15 in) of the cardboard to the higher edges of the sq. items.
- Fill the area between the triangle sheets with cardboard fragments and safe them with one another, with the assistance of adhesive tape.
- Repeat steps 3 and 4 and type one other degree of triangle sheets over the primary one. Afterward, make the highest of the home from 5 sequentially secured triangle sheets and safe it to the remainder of the development.
- With the assistance of a stationary knife, reduce one sq. from the underside degree and a triangle from the center, so that you simply get the door of the home. Place a cozy blanket and toys inside.
2. Toy rack
- Take 2 8×8 in cardboard sheets. Apply glue on the sting of one in all the sheets.
- Glue 2 sheets collectively. Make 18 of these billets.
- Glue one in all them with an edge to the left fringe of a rectangular piece of cardboard that’s 8×24 in.
- Glue 3 extra sq. billets to the oblong sheet at a distance of 8 inches from each other. Apply a skinny layer of glue over the higher edges of every billet.
6. Repeat steps 4 and 5 and make the second degree of the rack from 7 sq. billets.
7. Make triangle “roofs” from the 4 billets you could have left. Glue their edges collectively after which glue them to the higher crossbeams of the cabinets.
8. Cowl the rack with coloured paper inside and out of doors, and enhance the sides with adhesive wavy stripes. Place the rack in opposition to the wall and put the toys inside.
3. Shoe storage system
- Take a shoebox.
- Minimize it diagonally from each vast sides.
- Make yet another reduce alongside the underside of the field — on the suitable aspect, from backside to prime. Separate one a part of the field from the opposite and reduce off the sides of the triangular sides of the higher half.
- Take the a part of the field with a full backside and apply a skinny strip of glue alongside its edges.
- Glue the second a part of the field to the underside of the primary half so that you simply get inclined deepening inside.
6. Manage the storage of your footwear. Place one pair on the ground in the entryway.
7. Cowl it with the development, so that the primary pair of sneakers are inside.
8. Place one other pair of sneakers in the higher deepening.
9. Cowl the field with a lid and place the third pair of sneakers on it.
4. Stationery stand
-
Take a sq. piece of cardboard (6×6 inches). Draw 3 triangles with the sizes 2×1.6 inches, 2×3.1 inches, and a couple of.7×5.1 inches. Go away a small area of 0.5 inches from each edge and go away the identical distance between the figures.
- Minimize out rectangles with a stationary knife leaving a sheet with 3 “home windows.”
- Make 20-25 extra of these billets, place them over one another, and glue their edges collectively.
- Glue a stable sq. piece of cardboard (6×6 in) over them.
- Flip the stand the other way up, enhance with adhesive coloured paper on all sides, and place it on your desktop.
5. Artistic lamp
-
Take a beverage package deal and reduce off the highest with the lid.
- Minimize out 4-5 stars on either side.
- Adorn the field with adhesive-colored tape on all sides and reduce out the surplus paper the place the celebrities are positioned.
- Place the field on prime of an LED mild so that it covers all sides of the sunshine. Please observe that the lamp shouldn’t be touching the edges of the field after set up.
6. Desk hockey
-
Take a shoebox. Take away its lid. Make 6 spherical holes on the vast sides of the field (in its center half), and make rectangular holes in the center of every slender aspect of the field.
- Take 6 lengthy sticks. Paint half of them in yellow and half of them in inexperienced. Put every stick by way of spherical holes. They need to go by way of all the field and protrude 4 inches from either side. Safe 2 clothespins coloured yellow and inexperienced on every stick contained in the field.
- Throw a small ball into the field and begin the sport.
7. Pill case
-
Measure the width and the size of your pill. Put together items of material, every of which corresponds to the size of the pill + 1 inch. The width of the fabric ought to equal the width of the pill multiplied by 2 + 2.5-3 inches.
- Minimize out 2 rectangular items of the cardboard, the size and width of which corresponds to the parameters of the pill. And a separate sheet akin to the size and thickness of the system. Unfold them out on the improper aspect of the material. Go away a margin of 0.4-0.5 inches from every edge and mark the identical distance between the sheets.
- Apply glue to the sides of the cardboard sheets which are nearer to the sting of the fabric.
- Fold up the sides of the fabric and glue them to the cardboard sheets.
- Minimize out one other piece of material that’s the identical measurement as the billet and glue it proper aspect out.
- Take 4 items of an elastic band that’s 2-2.5 inches and make loops in every nook of the suitable aspect of the pill with the assistance of glue.